Latest Post

If there’s one thing to know about me, it’s that I have incredibly sensitive skin. I’ve said the word “rash” more times than I’d like to admit in my life, and I have to be very careful when trying new products (patch test, anyone?). All this to say: no matter what precautions I take, I’m very susceptible to razor burn.

Despite being diligent about swapping out my razor heads and prepping my skin for shaving properly, sometimes I still inexplicably get pesky razor burn bumps after I shave. I used to simply deal with it, until one day I got fed up and did some research on what I could do to expedite the healing of it when it does happen. Within my research, a $25 Amazon product kept appearing with rave reviews, swearing it’s a miracle cure for razor burn. Enter: Tend Skin.

Let it be known that Tend Skin is completely unglamorous; it looks like something that lives at the back of your dad’s medicine cabinet (and to be honest, it might). But its 51,000+ Amazon reviews and five-star rating made me give it the ole college try. Here’s what happened. 


What causes razor burn?

According to Cleveland Clinic, razor burn occurs due to the interaction between your razor blade, your hair, and your skin. Tiny cracks in your top layer of skin (epidermis), along with inflammation and a loss of hydration can occur when a blade moves across your skin. This causes red, irritated patches of skin, which sometimes includes small, pimple-like bumps.

Causes of razor burn include:

  • Dry shaving (shaving without any water, soap or shaving cream)
  • Shaving too fast
  • Shaving with a dull razor blade
  • Shaving against the direction of hair growth
  • Sensitive skin


How To Prevent Razor Burn

According to Cleveland Clinic, there are several things you can do to help prevent razor burn. 

  • Make sure your skin is moist before shaving.
  • Always use a lubricant, such as soap or shaving cream.
  • Shave in the direction of your hair growth (shaving in the opposite direction can cause irritation).
  • Use light, short strokes while shaving.
  • Clean your razor blade often. You should rinse the blade with water every few strokes.
  • Moisturize your skin after shaving with a fragrance-free gel or lotion.
  • Replace your razor blade frequently. A good rule of thumb is to replace your blade every 5-7 uses.


My Review on Tend Skin

Even though I follow the standard shaving protocol, unfortunately, after I shave, my sensitive skin still loves to break out in the telltale red bumps. After using Tend Skin for over a year (and hardly making a dent in my bottle), I don’t know how I ever lived without it.

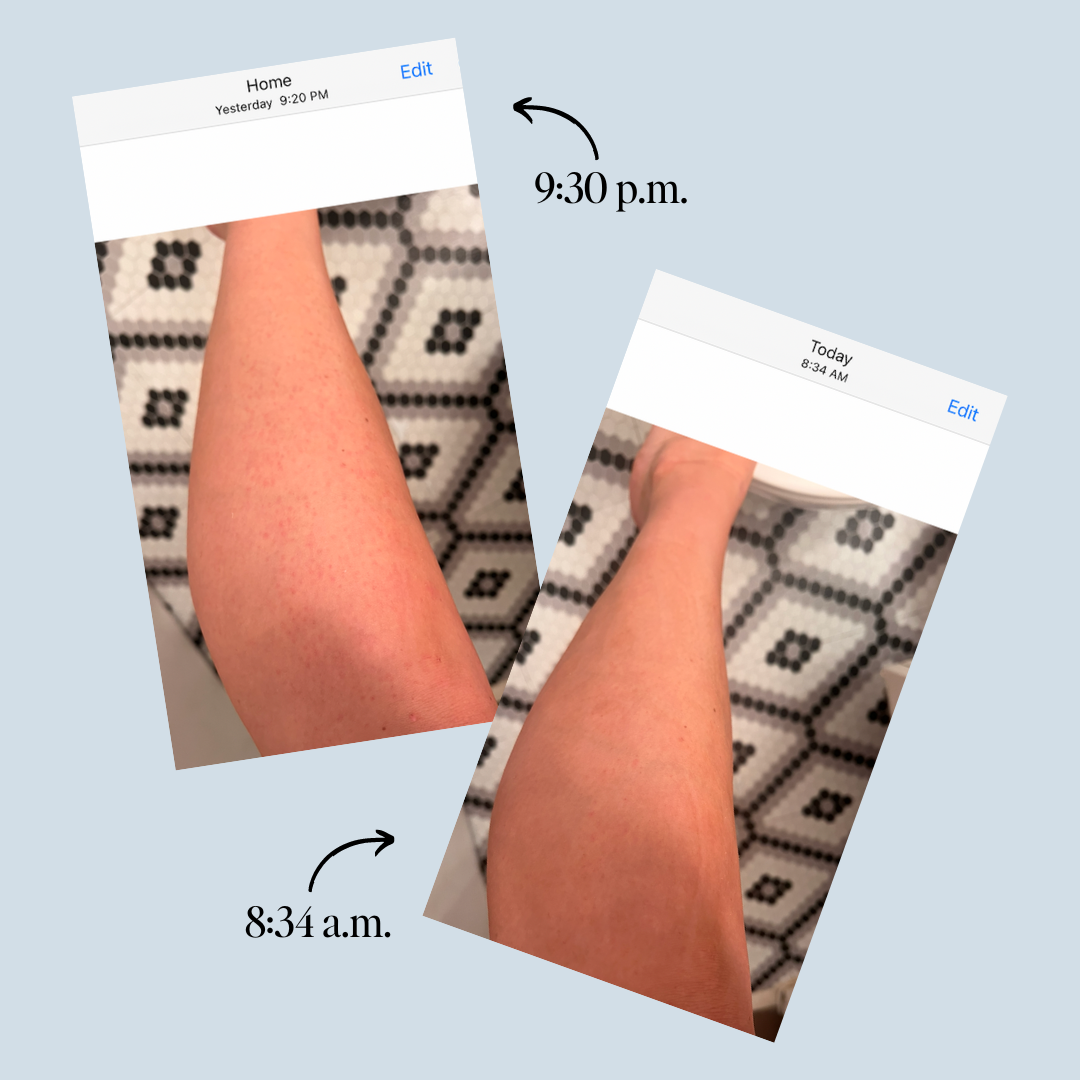
After I shave, I always moisturize and let my skin be for a little while. If I see signs of razor burn, I’ll apply Tend Skin on the area with a cotton pad. It does sting a bit, but minimally, and only for a few seconds. When I apply it at night, my razor burn will be completely gone by morning. The bumps, redness, irritation—poof, gone. The main area I get razor burn is my bikini line, which I didn’t photograph for obvious reasons, but the above 12-hour leg transformation is how it works for me in any area, every time.

I used to fear getting razor burn in the summer months, but with Tend Skin, I know that even if I do get razor burn, I can make it vanish within a few hours. It’s solely responsible for my skin being bikini-ready at any given time, and for that, I’m a fan for life.

15 Shaving Secrets to Help You Survive Summer
READ ON

The post This $25 Amazon Product is Like a Magic Eraser for Razor Burn appeared first on The Everygirl.

I’ll be the first one to admit that I’m quick to hop on the latest TikTok trend. The 12-3-30 workouts, all the coastal cowgirl looks that I’ve been wearing on repeat so far this spring, the list could go on and on. When I recently came across the “everything shower” trend, I knew I had to give this one a go, too. 

If you’re wondering what on Earth the everything shower is, 1) I’m truly honored to be the one to enlighten you and 2) your life is about to be changed for good. The everything shower is exactly what it sounds like. It isn’t your normal routine, it’s a long, deep-cleaning shower that doubles as a luxury self-care practice. It can involve as many steps as you’d like—from dry brushing to scalp massaging. 

Now if you’re like me, this in-depth shower routine can seem a little intimidating. When I first started partaking in this ultimate self-care experience, I didn’t even know where to begin or what products to reach for. That was until I tried out Athena Club: the inspiration behind my everything shower practice.

Athena Club is a sustainable yet affordable self-care and wellness brand that caught my attention a few months ago at Target and has had me in a chokehold ever since. They offer many high-quality, impulse-purchase-worthy products that are just as aesthetically pleasing as they are effective. (Plus, right now, we’re giving you yet another excuse to hit “add to cart” because you can snag 25% off your first Athena Club purchase on us by using code EVERYGIRL!) After using their Razor Kit, Cloud Shave Foam, Dewy Body Lotion, and Creamy Body Wash, I knew I found my starting lineup for my regimen. 

athena club razor kit
Athena Club

Razor Kit

Introducing, the everything shower's star of the show: Athena Club's award-winning Razor Kit. A buttery smooth shave is 100% guaranteed every time with its effective, high-quality stainless steel blades and water-activated hyaluronic acid and shea butter serum strip that moisturizes and soothes with every glide.

Get 25% off your first purchase with code EVERYGIRL!

Athena Club’s shaving products are truly the crème de la crème of my everything shower. In honor of the silkiest, smoothest shave I’ve literally ever had, here is the rest of my head-to-toe everything shower routine to help guide yours:


list of shower steps


For the mood:

I always start my everything shower by setting the vibes. I love making a real moment of it because honestly, I deserve some true self-care time (if I do say so myself). Whether you do something as simple as putting on your favorite playlist (Taylor Swift, do your thing, girl) or invest in some products that can make your bathroom an oasis, this step is crucial for making your everything shower stand out from your typical in-and-out rinse off. 

everything shower
Etsy

Fresh Eucalyptus

I can't think of a better way to get some serious aromatherapy than by hanging some fresh eucalyptus on your shower head. (If that's not your thing, you can also throw some shower steamers into your tub for some spa-like smells.)

athena club candle
Athena Club

Natural Wax Candle

Then, I dim the lights and light a candle. Athena Club's Natural Wax Candle is the one I turn to again and again for a soothing smell and ambiance.

everything shower
Amazon

Waterproof Speaker

Last, but certainly not least, I throw on some lofi music to really set the scene. JBL's waterproof speaker is small but very mighty.


For the body:

Before I dive into my everything shower, I grab a dry brush and gently massage my skin—starting at my feet moving upwards and towards my heart. ICYMI: using a dry brush exfoliates and improves your skin texture while increasing blood flow and promoting lymphatic drainage. Our wellness editor swears by this step and since I’ve incorporated it into my own routine, I’ve become a forever fan.

OSEA dry brush
OSEA

Dry Brush

I personally love this one from OSEA since it's easy to hold with its comfortable handle and wide brush head. I don't have to worry about it slipping, sliding, or falling out of my hand.


For the silkiest shave of my life:

Once I hop into my shower at a modest 500 degrees, the real fun begins. After staring at the wall and contemplating life for a few minutes, I reach for one of the most effective products in my everything-shower regimen: Athena Club’s Razor Kit.

Athena Club made razors based on how people actually shave—and it shows. When I use this little guy, it glides with me on its easy-to-hold ergonomic handle and leaves me with the closest shave. If I’m being honest, I can be a bit of a clumsy shaver so I heavily rely on the built-in skin guards and they haven’t let me down. I never get any cuts or scrapes, even on those hard-to-shave places like the knees and ankles, when I’m using this razor. When I first saw the price, I didn’t expect to be this impressed but I can honestly say it’s gained a permanent spot in my shower lineup.

To really get the full experience, pair your Razor Kit with their Cloud Shave Foam, Dewy Body Lotion, and Creamy Body Wash that left my legs feeling smooth as can be. Plus, Athena Club just launched in Target which makes getting your fix easier than ever (or, if your vibe is a 25% off discount, head to their website and use code EVERYGIRL to get 25% off of your first purchase online).

Athena Club razor
Athena Club

Razor Kit

Athena Club's Razor Kit not only does the absolute most when it comes to shaving, but it looks beautiful hanging on its easily-accessible magnetic hook that keeps your razor in tip-top shape—without getting slimey and gross.

Get 25% off your first purchase with code EVERYGIRL!


For the scalp:

Now, it’s time for one of the most underrated parts of my routine and a step I can’t believe I lived so long without—a scalp scrub. If you’re looking to remove build-up and purify your scalp and hair while giving it a good shine, adding a scalp scrub into your lineup is a great place to start. It’s as easy as one, two, three: Gently scrub this product into your scalp, wash it evenly throughout your hair, then follow it up with your normal rinse and lather with your go-to shampoo and conditioner.

scalp scrub
NEXXUS

Scalp Scrub

NEXXUS' Clean and Pure scrub is loved by many—and for good reason. One of my favorite features is that even though it's a deep scrub, it doesn't contain any sulfates, parabens, or dyes so you know it works with all hair types and colors.


For the feet:

Every everything shower needs the full head-to-toe treatment. Using a sole smoother gives my soles a much-needed refresh by exfoliating and removing calluses. First, I soak my feet and then gently massage the bottom of my feet with the coarse side of the stick before flipping the stick to smooth. 

pedicure stick
Tweezerman

Sole Smoother

Tweezerman's Sole Smoother is easy to hold and use with its long handle. Plus, unlike many other pedicure tools, this one is fully waterproof making it everything shower-approved.


For the face:

I like to keep the good vibes going even after I turn off my shower head. I always wrap up my everything shower practice by applying my favorite overnight face mask to help lock in moisture and set myself up for a glow that keeps on giving. My skincare goals in life are to look like a glazed donut after I apply all of my products, and trust me, this stuff gets the job DONE. 

sleep mask
Laneige

Overnight Face Mask

Laneige's Cica Sleeping Mask has been my trusty go-to the past few months whenever I need an overnight refresh. I always wake up looking more glowy, moisturized, and hydrated than I did the day before (and it locks that hydration in for days after I used it)! Talk about a deep moisturizer.


athena club logo

This post is sponsored by Athena Club, but all of the opinions within are those of The Everygirl editorial board.


The post 8 Essentials You Need for Your Everything Shower appeared first on The Everygirl.

Many people find the prospect of giving themselves a manicure at home to be daunting enough, but attempting to remove acrylic nails without the assistance of a nail tech can be especially intimidating. We’ve all heard (or maybe even experienced) the horror stories of painfully ripped off acrylics and torn up nail beds, and who wants to experience all that? No one. But if you don’t have time to make it to a salon and need those acrylic nails gone ASAP, safely removing them at home is entirely possible. It’s just all about knowing which methods are actually effective and not harmful. We cannot have crusty, broken nails for summer time, ladies. 

The internet is flooded with different DIY approaches to removing your acrylics yourself, from hot water to dental floss to even sliding a credit card underneath them (definitely stay away from that one). So, we’re here to tell you the cold hard truth: you need to use acetone to remove your acrylic nails. Don’t let anyone tell you otherwise! It’s the only way to remove them that ensures there is no excess damage to your natural nails. Acetone also does the most thorough job and keeps the process totally pain-free. So without further ado, here’s how to actually remove acrylic nails at home in a way your natural nails will thank you for later:


How To Remove Acrylic Nails

Source: Shutterstock


Trim Down & Buff

To start the removal process, you’re going to want to cut all of the excess length off your acrylics and buff off all of the polish (devastating moment, but it has to be done). But, this will make removing the nails much easier, allowing the acetone to soak in (which we’ll get to in a moment). 


What You Will Need:


Instructions:

Step 1: Using a strong pair of nail clippers, trim your acrylic nails as short as possible without cutting your real nails and damaging your nail beds. 

Step 2: If you have regular polish on top of your acrylics, you can simply remove it with some acetone nail polish remover (most nail polish removers have acetone in them and work more effectively, but acetone-free remover can also work). With gel polish, use the coarse grit side of your nail file to remove the shiny top coat. 

Step 3: Continue to gently file your nail until the shine of the nail is completely gone. Be very careful to not over-buff the acrylic, as it can end up weakening and/or damaging your natural nails. A good rule of thumb is to leave a thin layer of acrylic covering the entire natural nail, and the acetone soak will take care of the rest. 


Source: Shutterstock


Acetone Method #1: Foiling

Using acetone at home is a bit intimidating, as it’s an intense chemical with an even more intense scent that can leave your nails feeling frail and dried out. But as we talked about before, many methods that are labeled as “gentler options” are not safe ways to remove acrylics and can be both painful and ineffective. As long as you approach the process carefully, using acetone is totally safe and is definitely our best bet all around. 

There are two different methods to removing your acrylic nails with acetone, the first being the foil method. This is the approach used at a nail salon, and allows for minimal skin-to-acetone contact. While it’s a bit intricate, a little bit of time and patience with these steps will have your acrylics safely off in no time.


What You Will Need:


Instructions:

Step 1: Soak a cotton ball in acetone and place it on top of your acrylic-covered nail bed. Once it’s covering the entire area, wrap it tightly in a small piece of tin foil. Doing this with your non-dominant hand can be bit of a hassle, so take it slowly (or, have someone there to help you out to really make the process easier)! If you are doing this by yourself, we suggest doing one hand at a time for minimal room for error. 

Step 2: Once your nails are wrapped up, give each of them a squeeze to see if a bit of acetone drips out when you do so—this is a good thing! This is how you know you have enough acetone on the cotton ball. Now, let each nail soak for a minimum of 10 minutes. If the acrylic hasn’t broken down properly in that amount of time, you can let it soak for up to 20 minutes. To speed up the process, you can place a hot towel on top of your foil wrapped nails, as warm acetone works much faster. 

Step 3: Remove the foil and gently buff off any remaining acrylic, and use a cuticle pusher to gently scrape off any excess that turned to a gooey consistency. If leftover pieces don’t come off easily with a nail file, try wrapping theme again for a couple more minutes. Patience is key!


Source: Shutterstock


Acetone Method #2: Bowl Soaking

This other removal method is less labor intensive, but it does expose your skin to a higher level of acetone. This isn’t detrimental by any means—just be sure to follow proper after-care steps and you’ll be good to go.


What You Will Need:


Instructions:

Step 1: Take your bottle of acetone and run it under warm water. This step isn’t 100% necessary, but as we already mentioned, using warm acetone speeds up the removal process. 

Step 2: Pour your acetone into a bowl and dip your hand in to completely submerge all of your nails, and let them soak for about 30 minutes. As they’re soaking, use can your thumb to gently rub your other nails to help the acrylic loosen up.

Step 3: You’ll notice that gooey consistency the acrylic starts to melt into. Take your cuticle pusher and gently scrape it off the nail bed. Once the majority of it is gone and you’re done soaking, pat your nails dry and use your nail file to remove any small pieces of excess acrylic. 


Source: Olive & June


Hydrate Your Nails

Once the removal process is done, your nails will feel very dried out regardless of which method you used. But, there’s no need to worry. You can get them looking and feeling good as new with the right moisturizing and hydrating products:


What You Will Need:


Step 1: Immediately after removing your acrylics, wash your hands with warm water and a gentle soap to make sure all of the excess acetone chemicals are off of your skin.

Step 2: Apply a cuticle oil all around your nails beds to help moisturize the area.

Step 3: If your nails feel particularly weak or damaged, opt for a nail strengthening treatment and apply it to your nails a couple of times per week. It’s also a good idea to stick to gel nails or press-on nails until they feel strong enough to give acrylics another go.


Tools To Make It Easier


11 Wedding Nail Ideas That Aren’t a Traditional French Tip
READ NOW

The post How To Remove Acrylic Nails At Home appeared first on The Everygirl.

As the temperatures around summer get hotter every single year, we are quite literally entering a “Hot Girl Summer”. And while we deal with record-breaking heat, the last thing I want to deal with is my hair getting in my face. Whether you’re looking for more low-maintenance hair inspo or styles to keep your hair looking fresh and intact during your sweat attacks, protective hairstyles truly are the way to go! Regardless of your motive, protective styles keep you from constantly manipulating it all the time because they lessen the need for hands, other heat tools, and products while giving your hair a break (and the opportunity to grow).

From braids to twists to slicked-back buns, summer is the perfect time to try out new protective hairstyles that will give you the refresh and break you deserve. Ready to step into your “Hot Girl Summer” era? Keep scrolling for fresh new looks to try this upcoming season.


Two-strand Twists 

Two-strand twists are very lightweight and versatile and can be styled in numerous ways (Senegalese twists, Marley twists, Havana twists, etc.). They are also a great protective style for keeping your hair hydrated. Twists normally last a few weeks with proper care and maintenance.


Overnight Roller Set

Now, we’re not suggesting you wear this out (but if you wish, we won’t stop you), but wearing rollers overnight is great if you still want to achieve a classic blowout hairstyle without adding heat or a ton of product to your hair. 


Low Ponytail

It doesn’t get any easier than a simple low ponytail to keep flyaways away. You can amplify a low ponytail style with an oversized scrunchie, or even opt for a new parting style! Ponytails are perfect for keeping your hair slicked back and frizz to a minimum. I recommend using a silk scrunchie for less tension on your scalp and minimal breakage.


Bantu Knots

Bantu knots are a traditional southern African style where the hair is sectioned off, twisted, and wrapped—forming individual knots. They’re not only very low-maintenance, but they lock in moisture and keep your hair hydrated! This protective style makes any summer look playful and fun.


Hair Wrap

Hair wraps come in a multitude of colors, patterns, and styles and are perfect for when you’re just not feeling it (by “it” we mean putting any effort into doing your hair). It’s an instant way to dress up your outfit and make your look a little bit more fun. 


Top-knot Bun

Nothing says “one and done” like the classic top knot. It’s simple, never fails to bring the whole look together, requires minimal effort to accomplish, and locks in moisture, leaving your hair hydrated. Name something better than that. We’ll wait.


Braided Ponytail

A braided ponytail is a really playful and chic style that can be worn on the most casual summer days or for all of your summer soirees! Whether you wear it high, mid-length, or low, there is little-to-no tension on your scalp. Plus, it adds flair to your hair without needing heat tools.


Box Braids

One of the easiest styles to maintain is box braids. Box braids come in various sizes and lengths and are super easy to style and keep away from your face. Not to mention with proper care and maintenance, box braids can last for a month or more.


Slicked-back Bun

We see our favorite “it” girls (Bella Hadid and Hailey Bieber) rock this look all the time, and it simply never gets old. Like the top knot, the slicked-back style can make you look more polished and put together. Slicking your hair back with a silk scrunchie or a claw clip will ease up on tension and prevent breakage too! 


Locs

Locs are versatile and very long-lasting! Loc styles can include butterfly locs, faux locs, and boho locs, and each style is super unique and easy to style down or in an updo.


Cornrows

Your days of frizzy, damp hair are over with! Not to be confused with box braids, cornrows are braided flat against the scalp and away from the face. Cornrows can even be styled in an updo, making your summer days worry-free.


8 Trendy Summer Haircuts You’ll Want to Copy Immediately
READ NOW

The post 11 Damage-Free Protective Hairstyles to Try This Summer appeared first on The Everygirl.

Author Name

Contact Form

Name

Email *

Message *